ThirstyAffiliates now includes the Product Displays feature in its link management tools. With this feature, you can seamlessly convert plain text links into visually appealing product showcases, complete with images, detailed descriptions, pricing information, and a prominent “buy now” call-to-action button.
Furthermore, this tool provides supplementary engagement options such as a recommended badge and an extra call-to-action button.
This guide explains how to install and use the Product Displays add-on on your website.

What Are Product Displays?
Product displays enhance your website by showcasing products in an engaging format.
They replace basic text links with visually appealing representations, featuring images, descriptions, prices, and ‘buy now’ buttons.
This user-friendly format helps visitors quickly understand the products you’re promoting.
Beyond aesthetics, product displays improve the website’s overall user experience, making it easier for visitors to navigate and explore. Furthermore, this could potentially lead to increased commissions and sales.
Install and Active the Product Displays Add-on
Your first task is to install the Product Displays add-on.
- Navigate your WordPress Dashboard > ThirstyAffiliates > Add-ons. If you don’t see this page, you’ll need to update your version of the ThirstyAffiliates plugin.
- To find the Product Displays Add-on, browse the add-on list or search for “Product Displays” in the search tool.
- Click the Install Add-on button to install and activate it.
Once activated, the product display option will be added to the affiliate link editor screen.
Configure Product Displays Settings
Before creating your product displays, you can configure the button colors for your displays.
Navigate to ThirstyAffiliates > Settings > Product Displays. Here, you can choose the following colors:
- Button Background Color
- Button Text Color
- Button Hover Background Color
- Button Hover Text Color

Additionally, you can add your Affiliate Disclosure text to your product displays.
How to Create Product Displays
Product displays can be enabled and customized individually for each of your affiliate links.
Here’s how to set them up:
- Navigate to ThirstyAffiliates > Affiliate Links.
- Click on the New Affiliate Link button and create your ThirstyAffiliates link by adding the necessary data. Additionally, a product display can be added to an existing affiliate link by hovering over the link and clicking Edit.
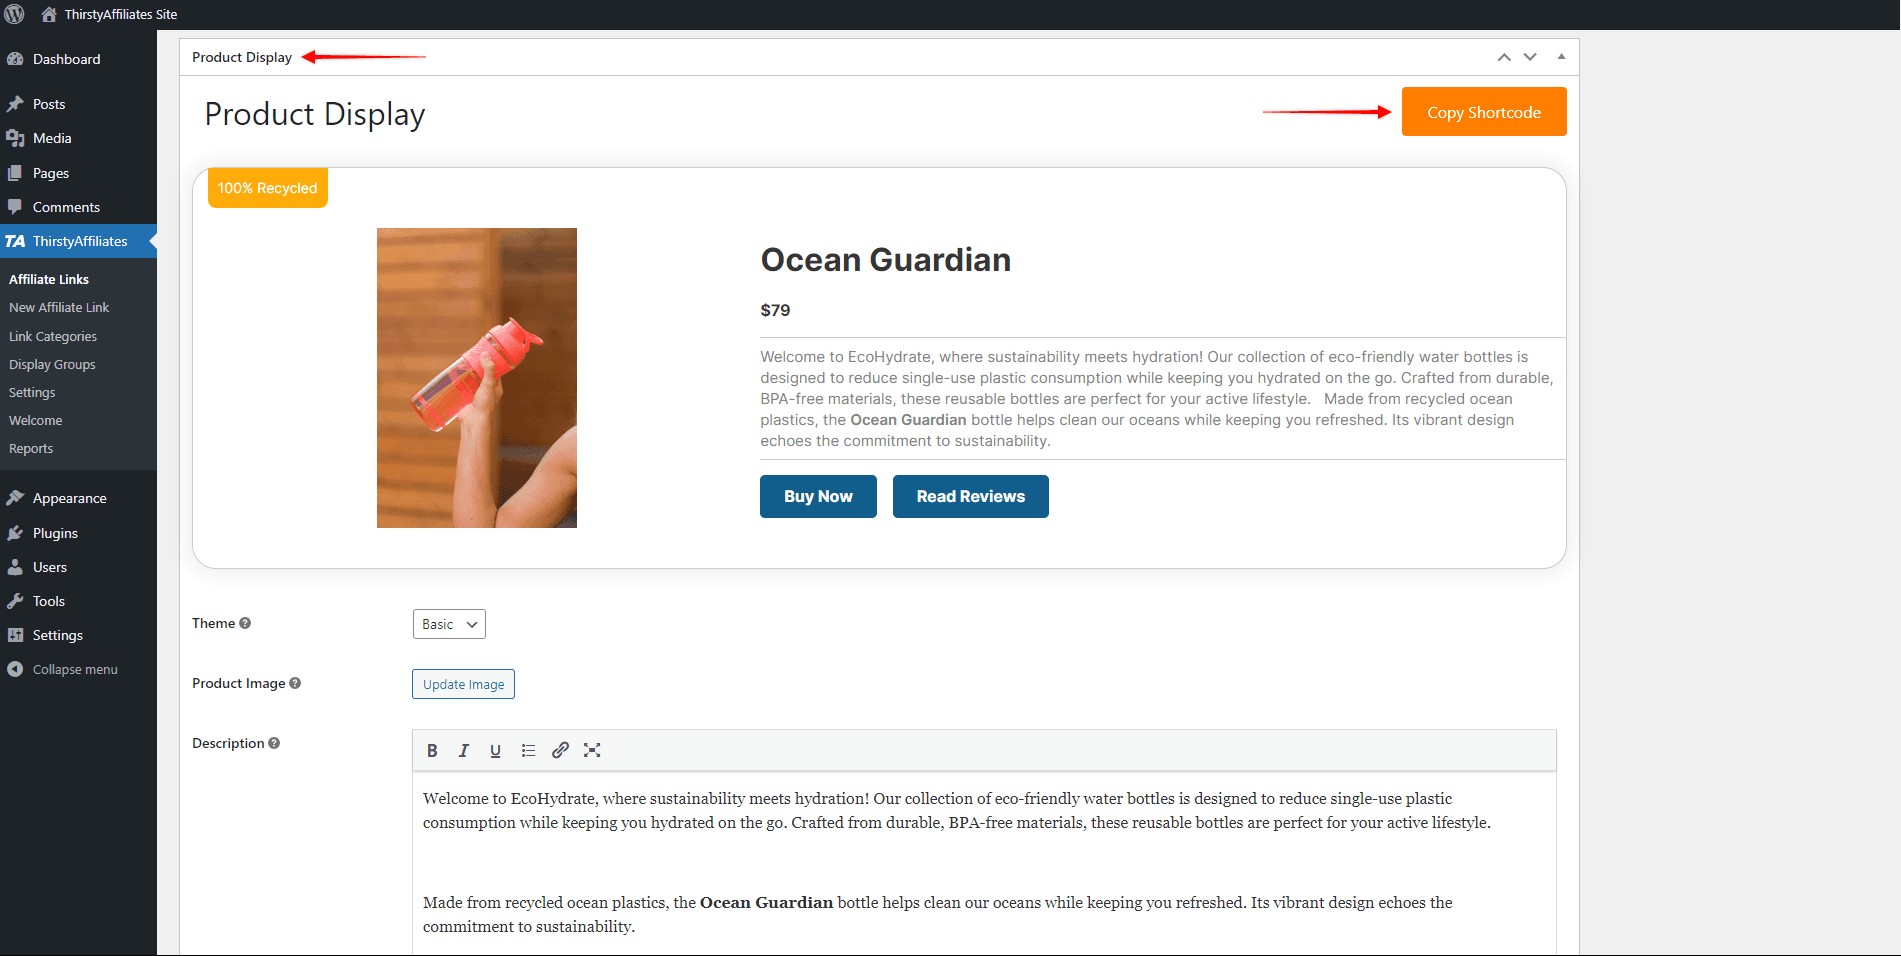
- While editing the link, scroll down to the Product Display section:
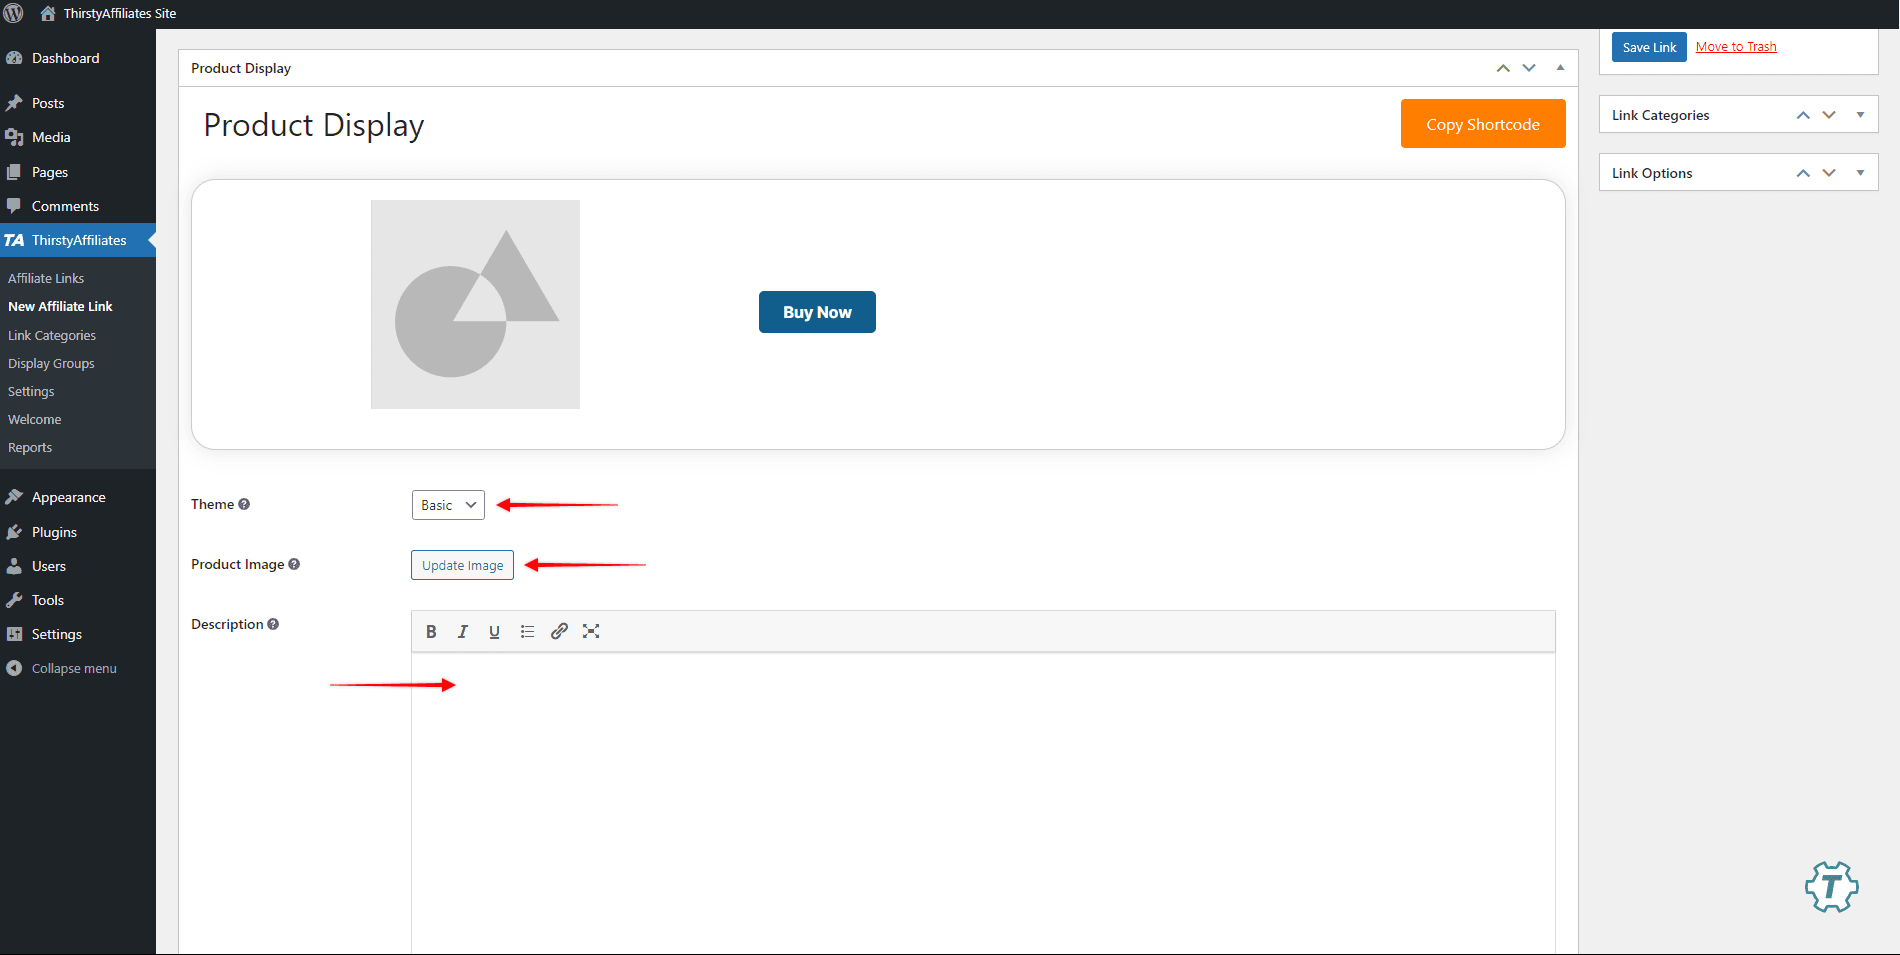
- Select your desired product display Theme from the available options: Basic, Boxed, or Sharp.
- Next, under the Product Image option, click the Update Image button. This will open a popup where you can upload an image or select one from your media library. Click Use this image to add it as your product image.
- Type in the product description in the Description field. This description will appear next to the product image.
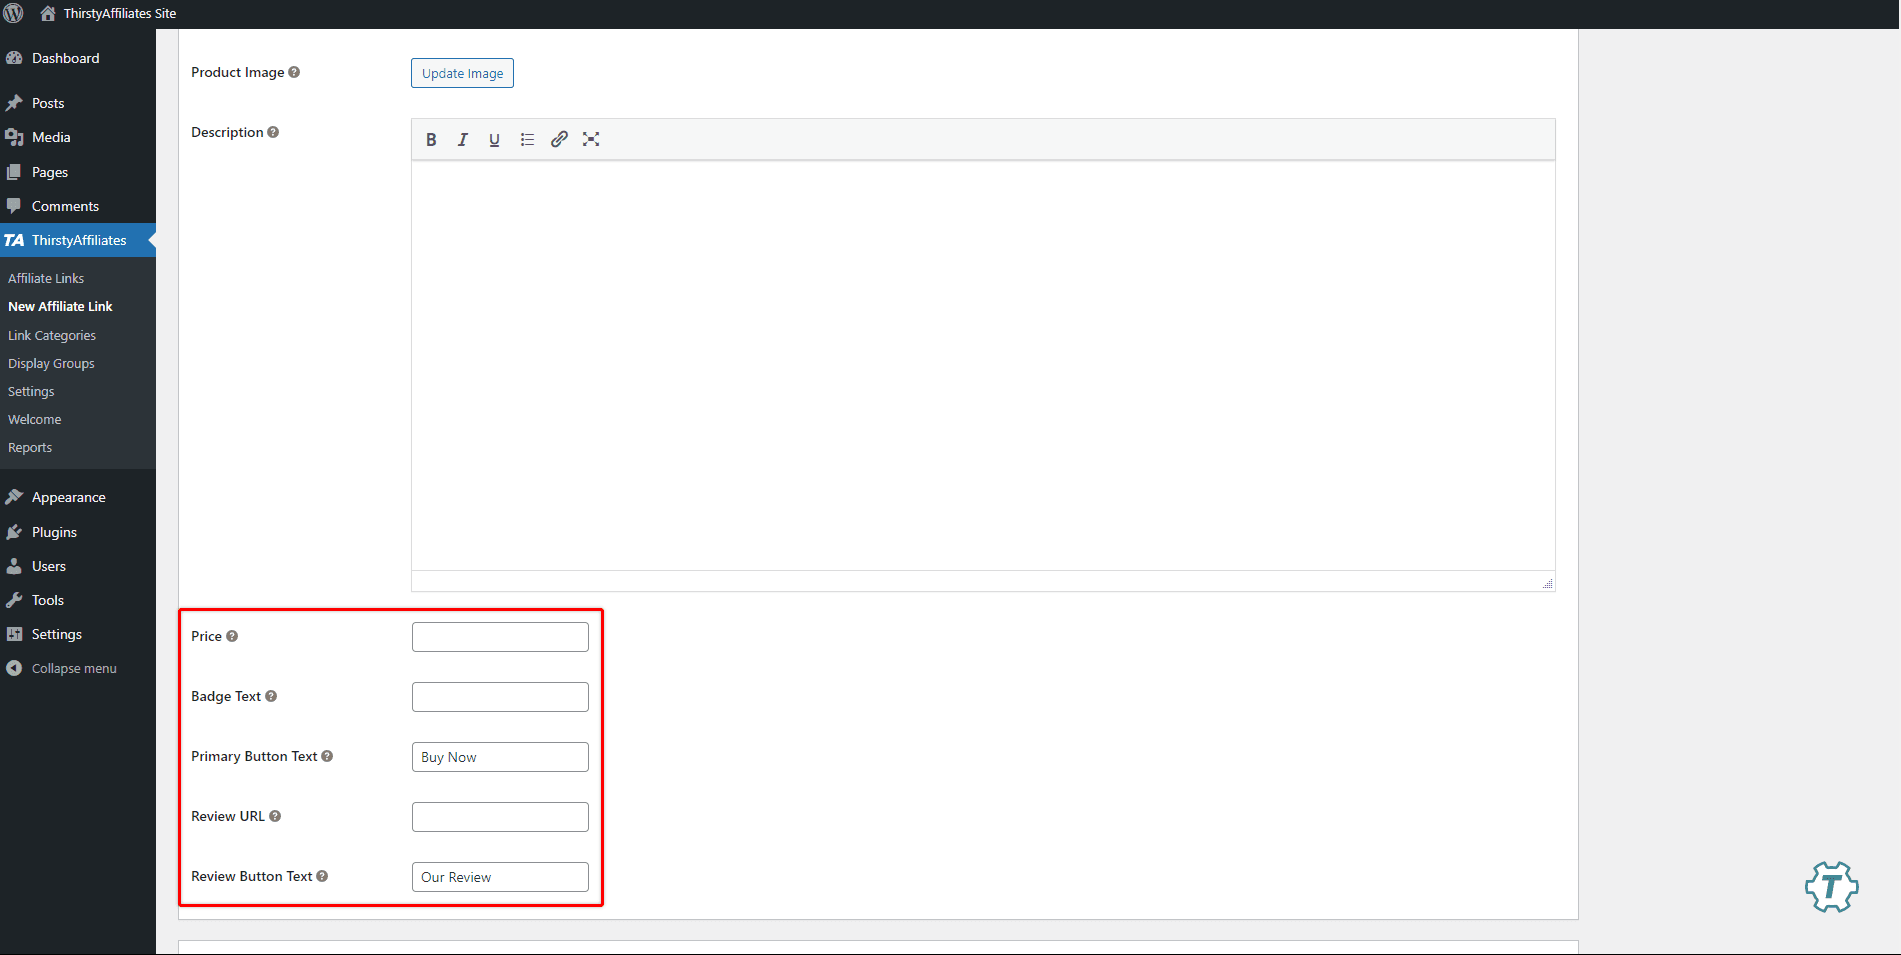
- By default, product displays have a single “Buy Now” call-to-action button. You can modify the button label by adding custom text to the Primary Button Text field.
- You can also add the price of a product (Price) and a custom badge (Badge Text).
- Optional: you can add an additional review button that links to further information associated with the product on display. To do this, add the linking page URL (Review URL) and the button label text (Review Button Text).
- Click the Save Link button to save changes.
Product Displays offer a live preview feature in the top section. Any adjustments you make to the product information will instantly reflect in the preview.

How to Add Product Displays to Your Content
After you’ve added the product display to your affiliate link, the next step is to incorporate it into your website content. You can achieve this in 2 ways:
- ThirstyAffiliates Product Display Block (Gutenberg): If you’re using the Gutenberg editor, you can insert a ThirstyAffiliates Product Displays block. This block allows you to integrate the product display into your content easily.
- Shortcode: Alternatively, you can insert the product display into your content using a shortcode. This method is applicable if you prefer using the classic editor or other content creation tools that support shortcodes.
Add a Product Display Block (Gutenberg)
This method is specifically designed for users who create content using the default WordPress Block editor, also known as Gutenberg.
In this case, you can easily add any of your product displays using the dedicated block:
- Start editing your content (page, post, etc.) with the Block editor.
- Click the block inserter (the + icon) button and search for the “TA Product Display”.
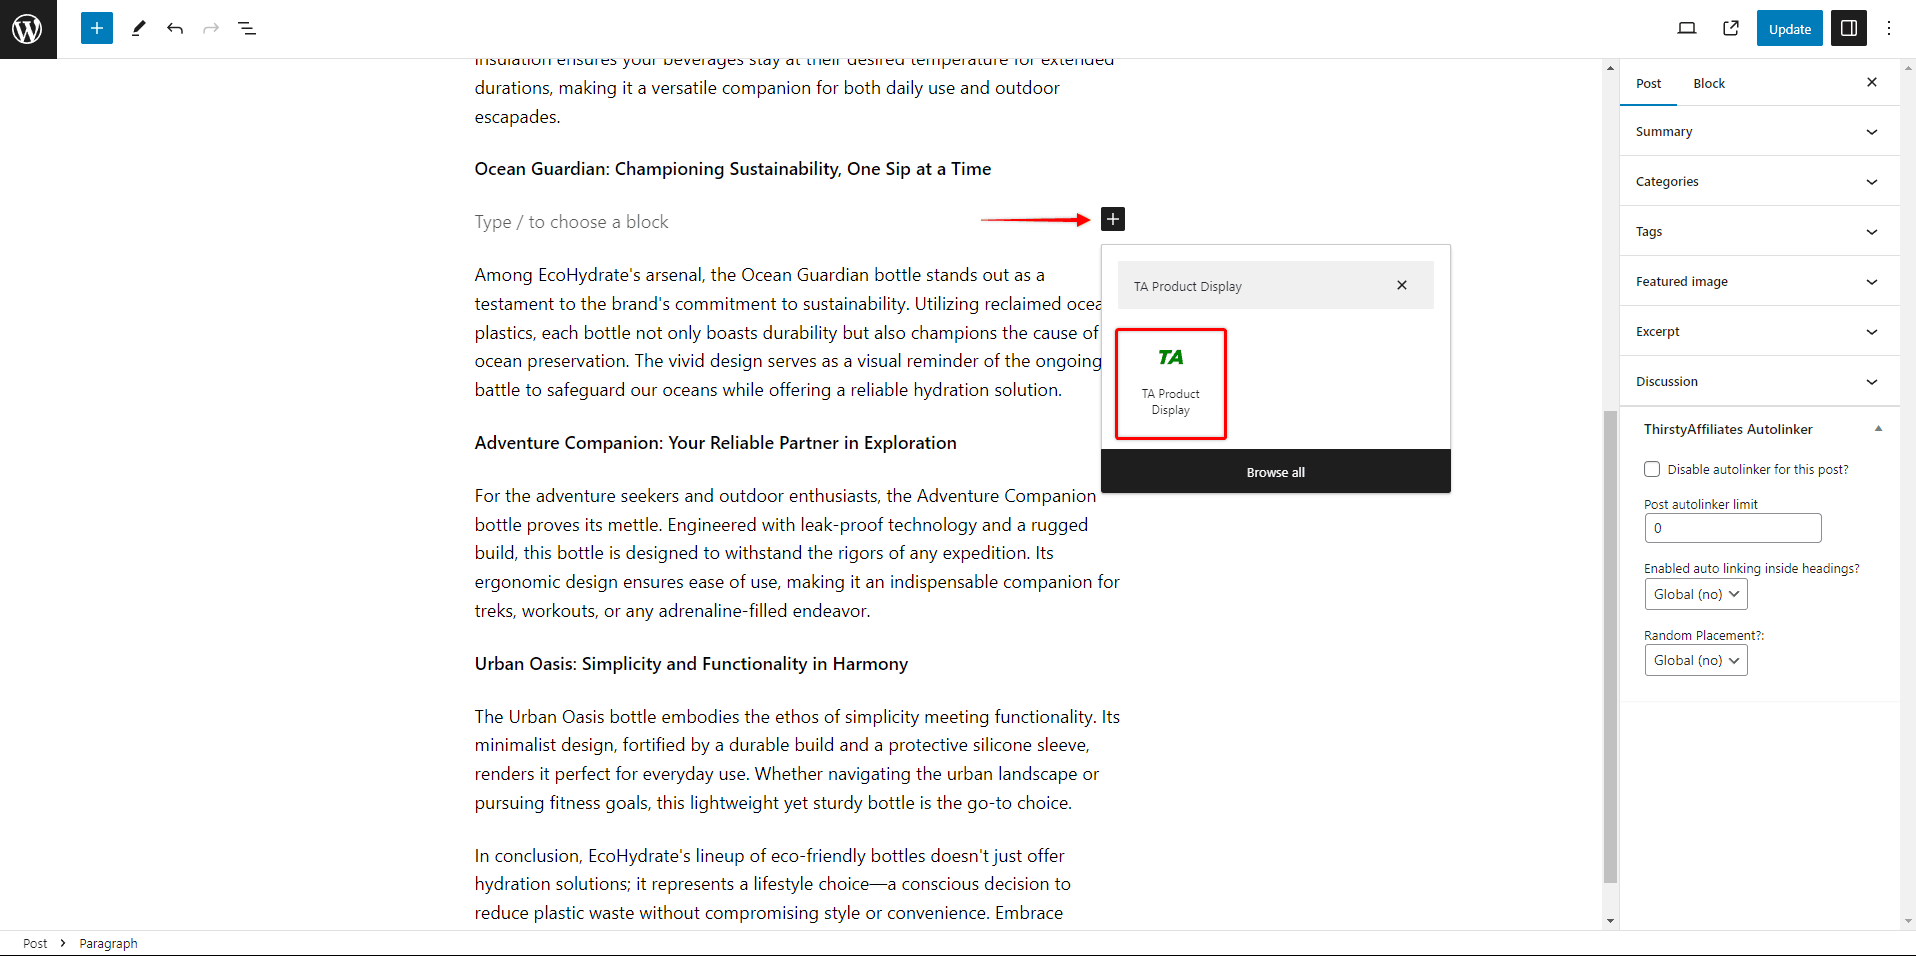
- Drag and drop or click on the TA Product Display block to add it to the desired place in your content.
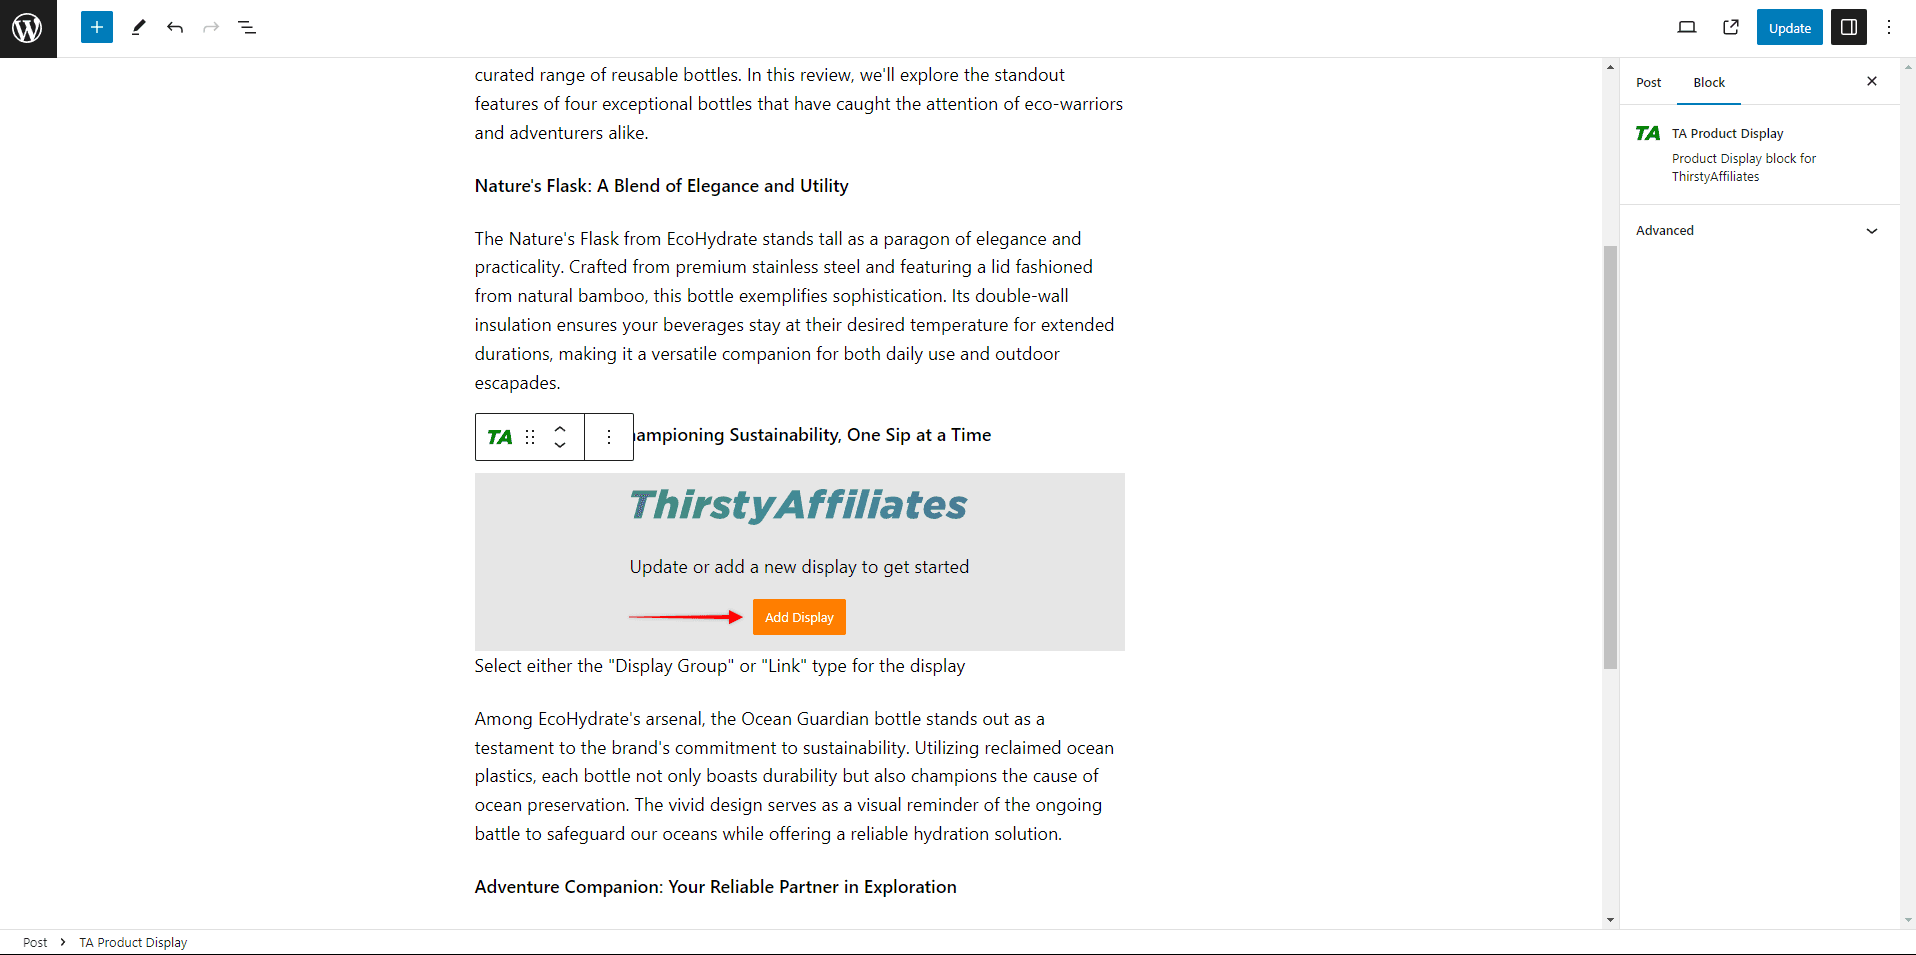
- Click the Add Display button to open the popup.
- Select a Single Link, and type the name of the link you need into the search field. This will automatically pull in the product display for the chosen link.
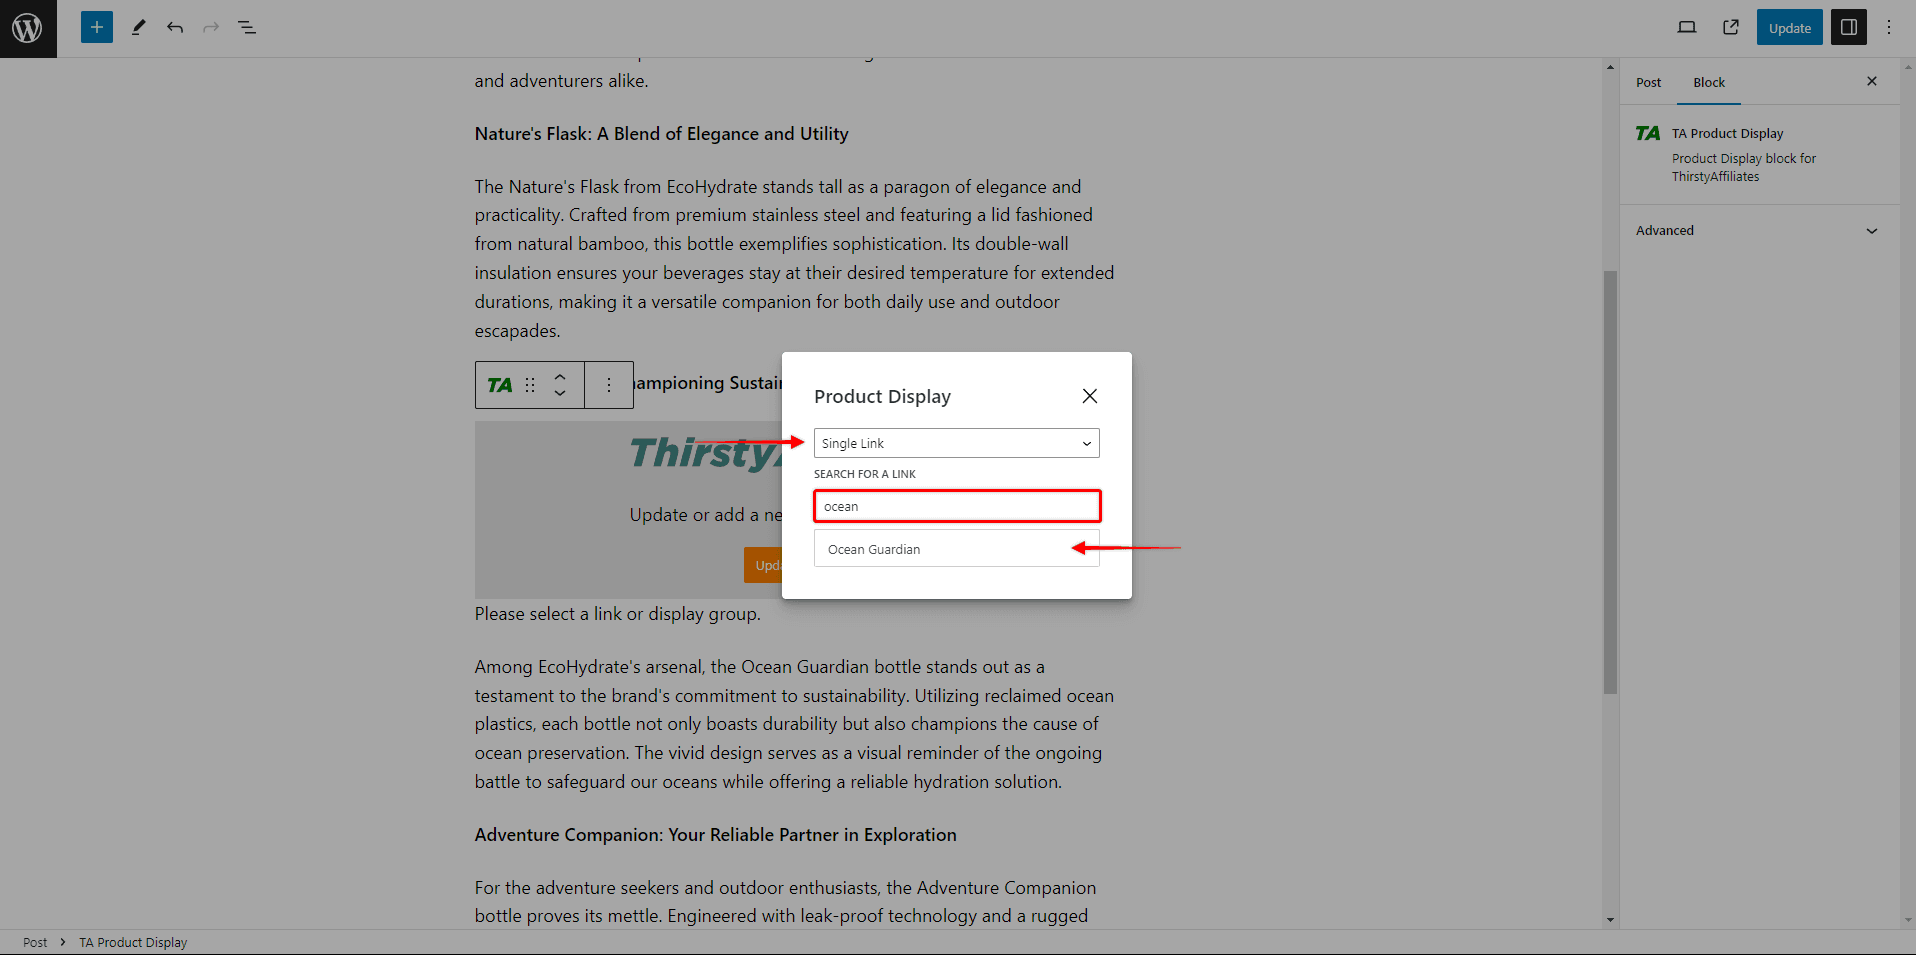
- Click Update to save changes to your content.

Add Product Displays Shortcodes
You can also incorporate your product displays using a shortcode. This approach allows you to embed product displays into your content using any editor that supports shortcodes.
This is the method to choose if you’re working with Elementor, Divi, or another page builder, including the default Gutenberg editor.
Product display shortcodes are available within the affiliate links settings:
- Navigate to ThirstyAffiliates > Affiliate Links.
- Find the affiliate link you need, and click Edit to access the link settings.
- Scroll down to the Product Display section.
- Click the Copy Shortcode button. The shortcode will be automatically saved to your clipboard.
Next, you need to add the product display shortcode to your content:
- Start editing your content (page, post, etc.) with the editor of your choice.
- Add the shortcode element of your editor (e.g. Elementor’s Shortcode widget, or Divi’s Code module) to the content.
- Paste the product display shortcode into the shortcode element.

4. Click Update to save changes to your content.
Product Display Groups
Product Display Groups allow you to showcase multiple product displays together. Thus, you can group and import your individual links into your content using only one shortcode.

How to Create Product Display Groups
Product Display Groups allow you to showcase multiple product displays collectively, making it easy to group individual links and insert them into your content.
- Navigate to ThirstyAffiliates > Display Groups.
- Click on the Add New Post button.
- Add the Display Group name.
- Under the Group Type dropdown, choose if the product display should be organized as a List or a Grid.
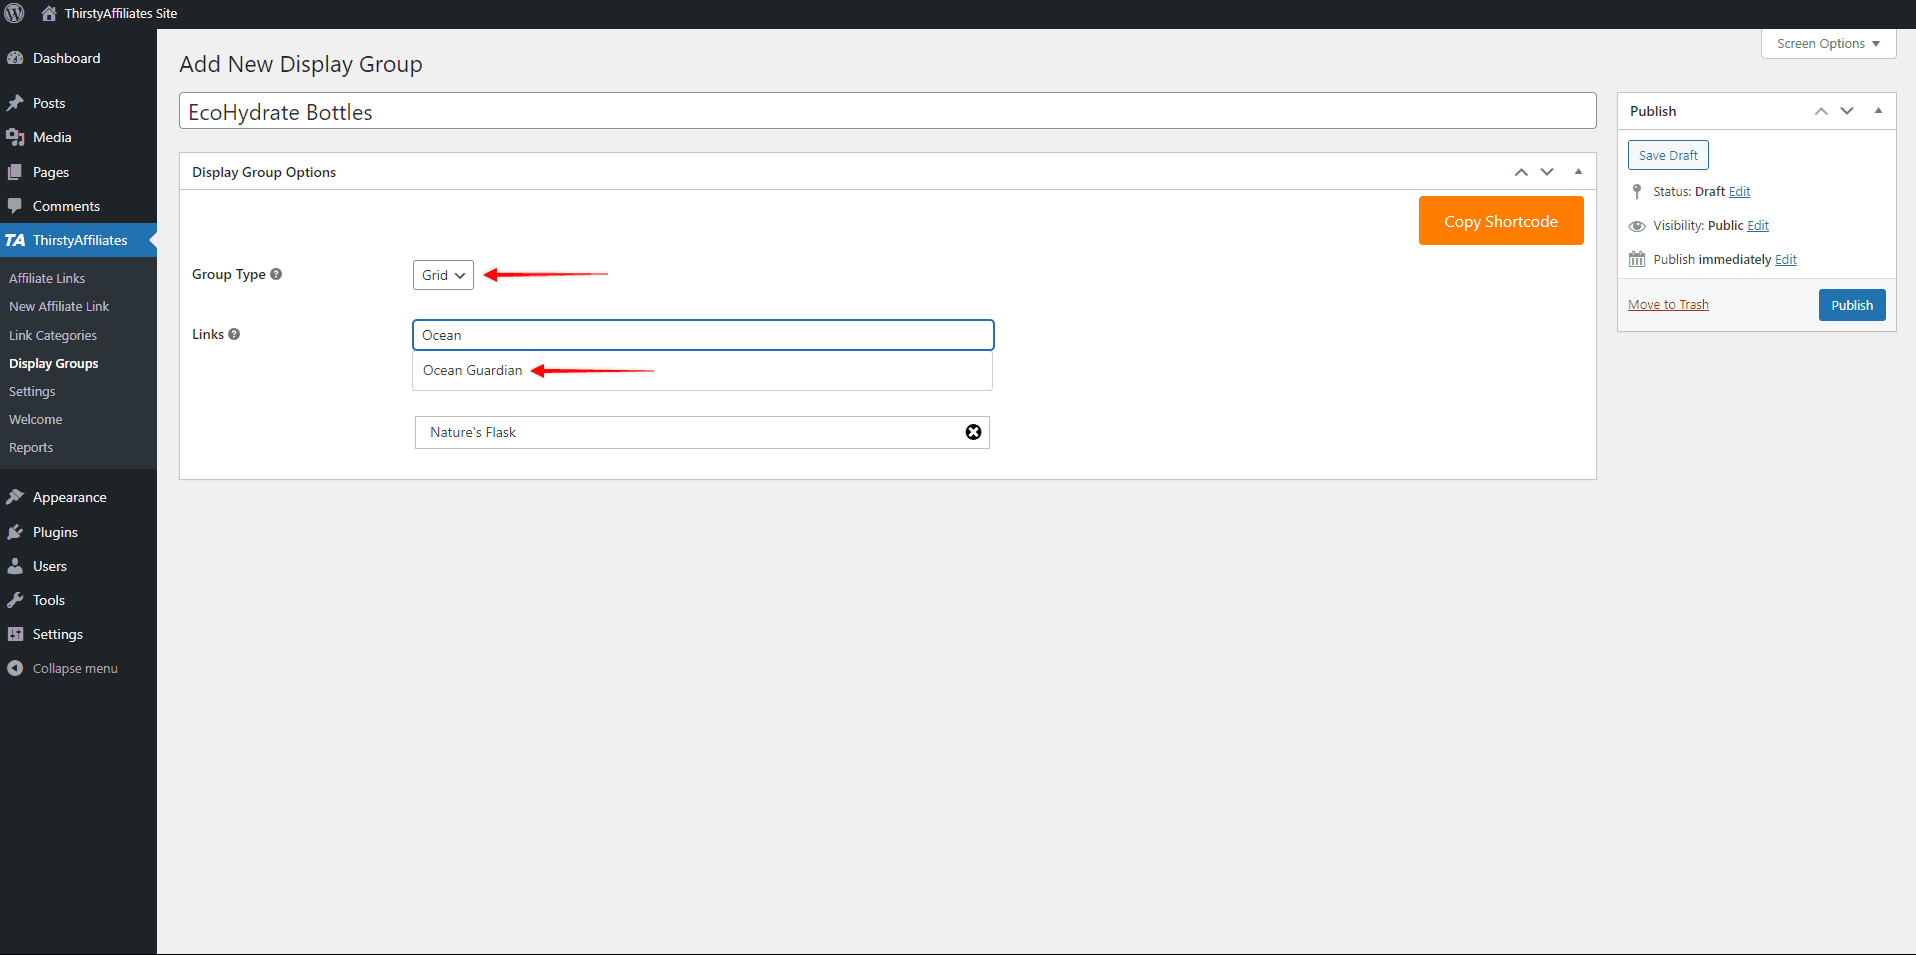
- In the Links field, start typing the name of the first affiliate link you wish to add to this group. Select the link from the link to add it to the group.
- Repeat the previous step for all of the affiliate links that should be included in this group.
- Click the Publish button to create a group.
If needed, you can remove links from your groups by clicking the X icon of the link.

How to Insert a Product Display Group via Block
The TA Product Display block functions seamlessly with your groups, operating in the same manner as it does for individual links.
The only variation occurs in step 4 of the process when inserting a group into your content using the block.
In this step, rather than selecting Single Link, opt for the Display Group option.

Now, type in the name of the group you need in the search field to pull in the display group.
How to Insert a Product Display Group via Shortcode
Again, you can include a product display group in your content using a shortcode, just as you would an individual product display.
To find your product display group shortcodes, follow these steps:
- Navigate to ThirstyAffiliates > Display Groups.
- Find the display group you need, and click Edit to access the group settings.
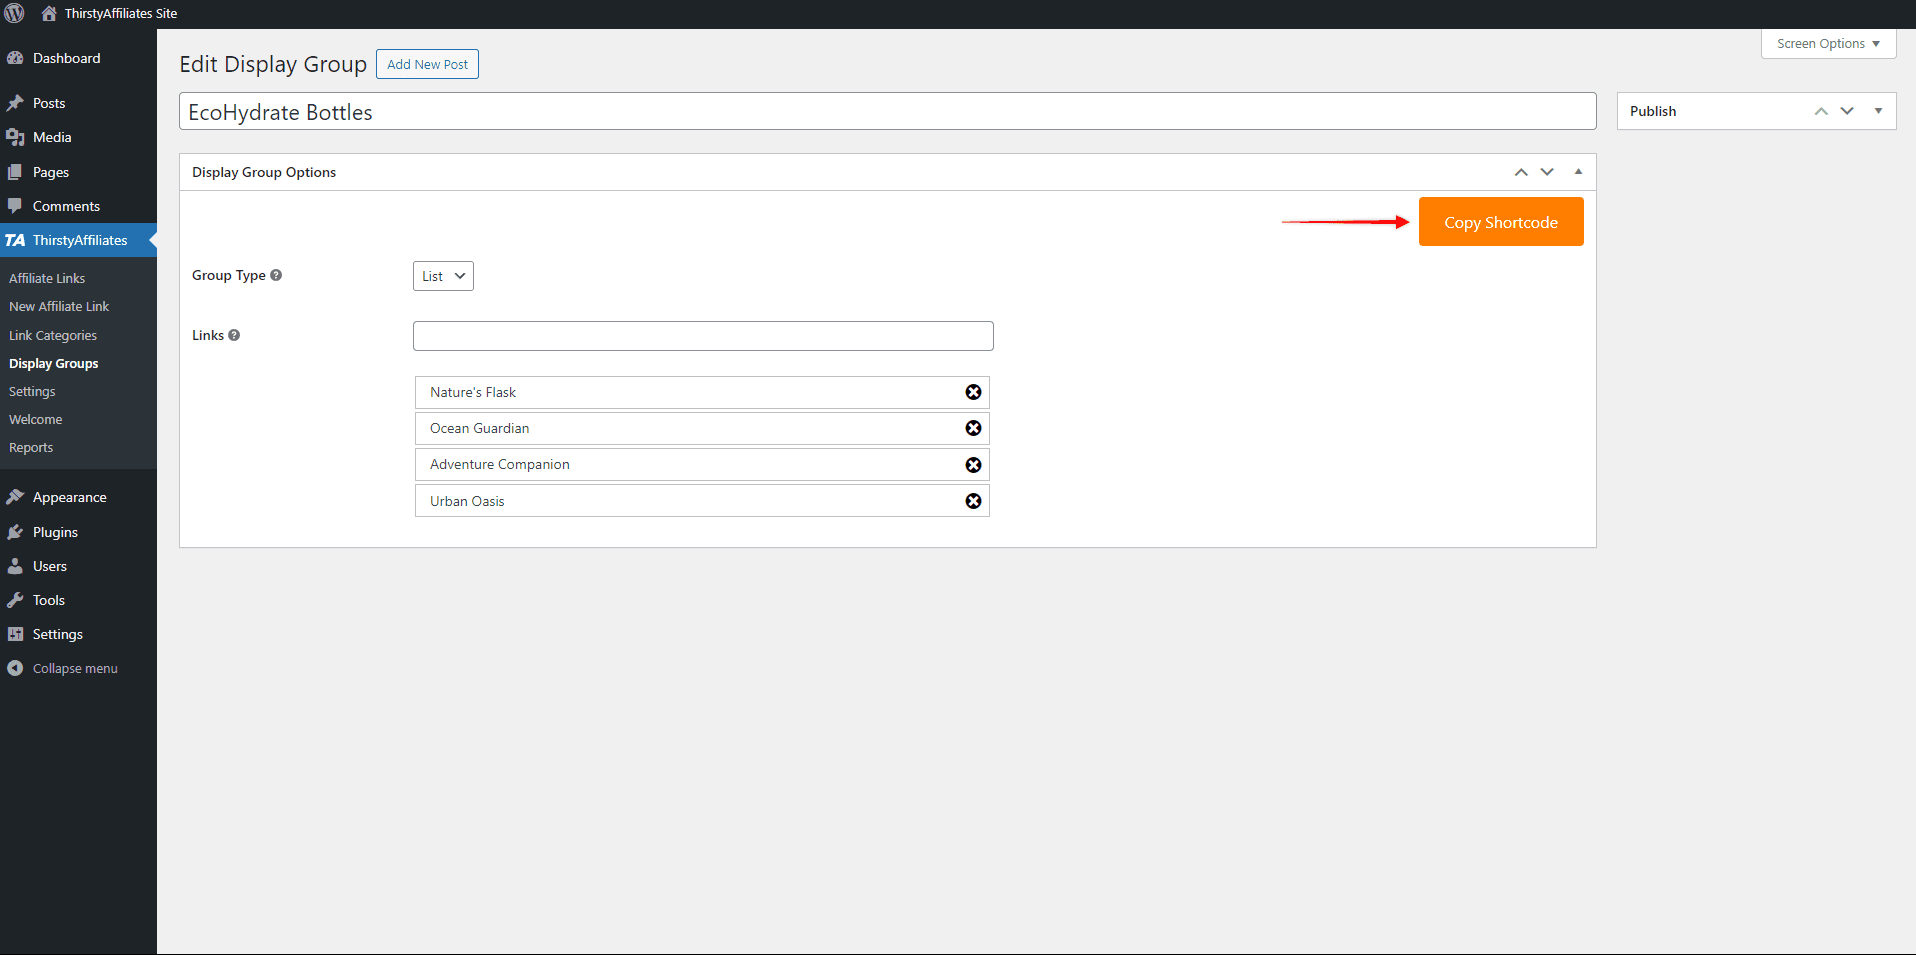
- Click on the Copy Shortcode button.
The shortcode will be automatically saved to your clipboard.